Installing X-10 and UPB with the Cortexa
(Note: Originally, I was using X-10 devices to control lighting and a few other devices in the house. X-10 is slow...very slow it would takes multiple seconds for commands to reach a switch and a light to be turned on or off. What was worse is that sometimes the commands would get "lost" and the light would never receive the command. Or, maybe it would receive the command, say a "dim" command, but it would receive it incorrectly and so it would dim, but to the wrong level.
After experiencing too many missed signals with X-10, I chose to switch over to using UPB. UPB is a different protocol and sends signals over the power line wiring, just like X-10, but it does it in a completely different way...and that way works great. Reportedly, X-10 has a reliablitly in the 70% - 80% range. That matches my experience. UPB, reportedly has a reliability above 99%. I can vouch for that. I never saw a missed command...and it's fast, like instant. UPB has a raw transmit speed of 240 bits per second, which is blazing fast for sending quick commands. Click here to learn more about how the UPB Protocol works.
In short, after switching to UPB devices, I never looked back. UPB isn't as popular as some other protocols and there may not be as many devices available, but it works great.)
X-10 is an open industry standard used for communication of home automation equipment. Household electrical wiring is used to send digital data between X-10 devices. The beauty of this is that a person can replace traditional light switches with X-10 compatible switches without having to run extra control wires. An X-10 "controller" can then send digital X-10 commands to the switches. This digital data is encoded onto a 120 KHz carrier which is transmitted as bursts during the relatively quiet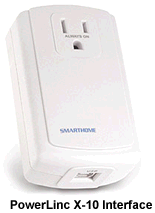 zero crossings of the 50 or 60 Hz AC alternating current waveform. One bit is transmitted at each zero crossing. The digital data consists of an address and a command. More advanced controllers can also query equally advanced devices to respond with their status. This status may be as simple as "off" or "on", or the current dimming level, or even the temperature or other sensor reading. X-10 devices range from light switches and receptacles to irrigation systems and sensors.
In order for the Cortexa to control your X-10 Devices, you will need an X-10 interface. It appears that the Cortexa can only use the PowerLinc from Smarthome (I tried an older CM11A controller from X10.com and it didn't work). It also appears that the serial (not USB) version may be required. The PowerLinc will plug into one of your home power receptacles near your Cortexa and then attach to the Cortexa via a serial cable. The PowerLinc acts as an interpreter between the X-10 signals on the power lines and serial binary data from the Cortexa.
In order to configure the Cortexa to communicate with the PowerLinc, Enter the "Cortexa Configuration Utility" via the "Setup" button on the My Home Front page. Select "Sub-System Setup" from the menu. You should see a screen that displays all the sub-systems that can be configured. At the top you should see the X-10 PowerLinc entry. Simply select the serial port to which you connected the PowerLinc and "Save" your settings.

X-10 sub-system configuration
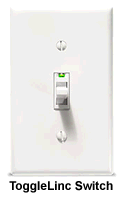
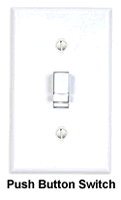
Now that the Cortexa can communicate with X-10 devices, you're going to need some X-10 modules to control your lights and devices. X10.com sells quite a few modules and switches. They are fairly inexpensive, but don't have a lot of features. Their switches are either push button or Decora style, but they don't have any that look the same as a normal toggle type switches. Their switches cannot dim the lights at the switch (you must dim them remotely).
My favorite switches are from Smarthome.com and are the ToggleLinc brand. These switches seem to be very well made. I've used these switches for over a year and love them. They have tons of features (they make a couple of models, so you'll want to decide which options you want before deciding to buy). They have a really cool LED just above the toggle so you can see the switch in the dark (the LED only glows when the light is off). Some of the features the ToggleLinc switches provide are: Dimmable, Adjustable Ramp/Fade Rate, Adjustable On Level, Receives Scenes, Responds to Sends Status Commands, Directly Controls other Devices, Low X-10 Signal Absorption, etc...
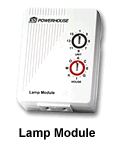
In addition to light switches, you'll probably want to control other devices. Available are lamp modules (to control desk lamps), appliance modules (perhaps you want to control a box fan or higher wattage device), irrigation controllers, etc...
Once you install your switches and modules, you will need to assign each one a unique code. This is how the Cortexa will know which switch or module to "talk" to or which module is talking to it. The X-10 protocol allows for up to 256 unique codes. This unique code or address is divided into two parts, a House Code (the letters A through P) and a Unit Code (the numbers 1 through 16). You may want to assign House Codes by areas. For example, you may want to use the House Code "A" for the master suite. In this case, the main light could be A1, bed-side lamp A2, overhead fan switch could be A3. Your kitchen lights and modules could be B1, B2, etc...
The X10.com switches and modules are assigned an address by selecting a letter (House Code) and number (Unit Code) on the two dials (you can see the dials on the lamp module above).
The ToggleLinc switches have many, many options that can be programmed into them, including the address. In order to set the address of the ToggleLinc (the switch must be installed first), press and hold the small LED above the switch for three (3) seconds then release. The LED will begin blinking and the light(s) attached to the switch will turn on. At this point you have 30 seconds to transmit the address for this switch. The switch will accept the first address it finds on the powerline. There are several ways to transmit an address on the powerline. You can use a special handheld X-10 transmitter, the Cortexa or a software program on your computer (in which case you also need the PowerLinc or similar X-10 interface/controller attached to your computer). I have an older CM11A X-10 controller (attached to my computer) that I bought from X10.com. Using their software (ActiveHome), I simply configure a new virtual switch with the address I want to use for the ToggleLinc.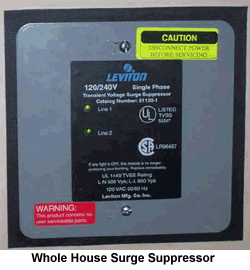
 Once the ToggleLinc is in programming mode, I "turn on" this new switch in ActiveHome. The ToggleLinc will see this new address transmitted over the power lines and will accept this as its permanent address. Of course, when programming a new switch like this, it's important to make sure that no other X-10 devices (or the Cortexa) transmit any other X-10 commands during this time or the ToggleLinc may intercept and accept the wrong address.
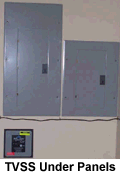
Since your X-10 devices are going to be directly wired into your home's electrical system, you may wish to consider a "whole house" surge suppressor. It's possible to invest quite a lot of money into switches and modules and you don't want them ruined from unexpected surges. The surge suppressor (or Transient Voltage Surge Suppressor) can cost $100 - $200, but can potentially save you a lot of money. Not only will your X-10 devices be better protected, but so will your other home electronic equipment. This device will need to be wired directly into your electrical panel, so you will probably need an electrician's help. I mounted mine flush with the wall just below my electrical panels. I live in an area with frequent lightning storms and we have power outages all the time. So far I haven't had and X-10 or electronic equipment go bad because of surges.
Another device you may wish to consider purchasing is a bridge/repeater. Most homes in North America have split phase or 3-wire single-phase in the electrical panel. Basically this means there are two separate 120 volt legs (when combined produce 240 volts). Most lights and receptacles in the house will be balanced between the two 120v legs. In order for an X-10 signal to jump from one leg to the other,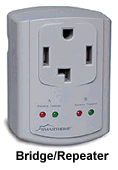 it has to travel to the distribution transformer outside of your house and back into your house on the other leg. The signal can have a difficult time jumping through the transformer and become lost. This can manifest itself when your X-10 interface is on one leg of the electrical system, and seems to work fine with some X-10 devices, but doesn't work (or works sporadically) with X-10 devices on the other leg. This is where the bridge repeater comes in. This handy device can plug into a dryer 220v outlet. It "bridges" the two legs of the electrical system and allows the signals to jump between them without having to go all the way out to the street transformer and back. What's more, the bridge/repeater will detect X-10 signals on the powerlines and send them back out amplified. This is especially important if you have a very large home (3500+ sq ft) where the X-10 signal is not strong enough to make it all the way from the controller to the switch/module. My home is 4200+ sq ft and I've had great luck with my bridge/repeater. I rarely, if ever, have a missed signal or non-complying switch or module.
Once you have your switches, modules and other X-10 devices installed and configured with addresses, you are then ready to set up the Cortexa to control them. Enter the Cortexa Configuration Utility as described above. Click on the "Device Manager" link and you should see a screen similar to this:
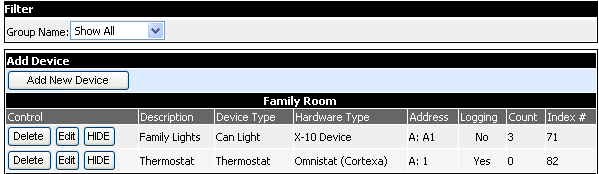
Device manager Screen
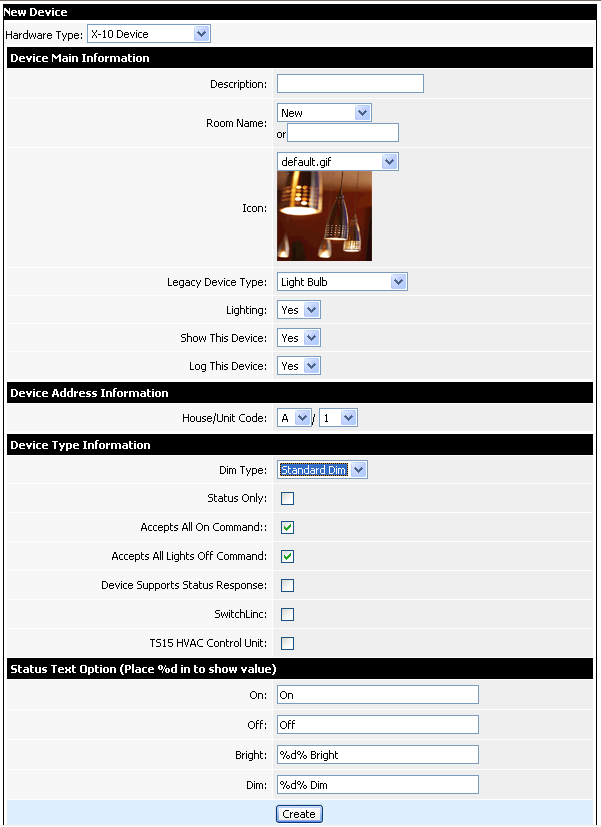
Click the "Add New Device" button and you should see the New Device setup screen.
Device manager Screen
The first step is to select "X-10 Device" for the Hardware Type. Next select a description for the X-10 device like "Ceiling Lights" or "Desk Lamp". You will probably want your devices grouped by room, so select the room name from the drop-down box or if the room name hasn't been created yet, select "New" from the drop-down and type in the new room name in the text field below. You may then select the appropriate graphic image for your X-10 device. You can also upload your own images into the Cortexa by using the "Graphics Manager". Select the proper answers for the remaining questions and make sure you enter the proper address for this particular X-10 device. When you are finished you can save your settings.
When you have set up all of your X-10 devices, you will probably want to set up "Events" so that you can control these devices.
After experiencing too many missed signals with X-10, I chose to switch over to using UPB. UPB is a different protocol and sends signals over the power line wiring, just like X-10, but it does it in a completely different way...and that way works great. Reportedly, X-10 has a reliablitly in the 70% - 80% range. That matches my experience. UPB, reportedly has a reliability above 99%. I can vouch for that. I never saw a missed command...and it's fast, like instant. UPB has a raw transmit speed of 240 bits per second, which is blazing fast for sending quick commands. Click here to learn more about how the UPB Protocol works.
In short, after switching to UPB devices, I never looked back. UPB isn't as popular as some other protocols and there may not be as many devices available, but it works great.)
X-10 is an open industry standard used for communication of home automation equipment. Household electrical wiring is used to send digital data between X-10 devices. The beauty of this is that a person can replace traditional light switches with X-10 compatible switches without having to run extra control wires. An X-10 "controller" can then send digital X-10 commands to the switches. This digital data is encoded onto a 120 KHz carrier which is transmitted as bursts during the relatively quiet
zero crossings of the 50 or 60 Hz AC alternating current waveform. One bit is transmitted at each zero crossing. The digital data consists of an address and a command. More advanced controllers can also query equally advanced devices to respond with their status. This status may be as simple as "off" or "on", or the current dimming level, or even the temperature or other sensor reading. X-10 devices range from light switches and receptacles to irrigation systems and sensors.In order for the Cortexa to control your X-10 Devices, you will need an X-10 interface. It appears that the Cortexa can only use the PowerLinc from Smarthome (I tried an older CM11A controller from X10.com and it didn't work). It also appears that the serial (not USB) version may be required. The PowerLinc will plug into one of your home power receptacles near your Cortexa and then attach to the Cortexa via a serial cable. The PowerLinc acts as an interpreter between the X-10 signals on the power lines and serial binary data from the Cortexa.
In order to configure the Cortexa to communicate with the PowerLinc, Enter the "Cortexa Configuration Utility" via the "Setup" button on the My Home Front page. Select "Sub-System Setup" from the menu. You should see a screen that displays all the sub-systems that can be configured. At the top you should see the X-10 PowerLinc entry. Simply select the serial port to which you connected the PowerLinc and "Save" your settings.
X-10 sub-system configuration
Now that the Cortexa can communicate with X-10 devices, you're going to need some X-10 modules to control your lights and devices. X10.com sells quite a few modules and switches. They are fairly inexpensive, but don't have a lot of features. Their switches are either push button or Decora style, but they don't have any that look the same as a normal toggle type switches. Their switches cannot dim the lights at the switch (you must dim them remotely).
My favorite switches are from Smarthome.com and are the ToggleLinc brand. These switches seem to be very well made. I've used these switches for over a year and love them. They have tons of features (they make a couple of models, so you'll want to decide which options you want before deciding to buy). They have a really cool LED just above the toggle so you can see the switch in the dark (the LED only glows when the light is off). Some of the features the ToggleLinc switches provide are: Dimmable, Adjustable Ramp/Fade Rate, Adjustable On Level, Receives Scenes, Responds to Sends Status Commands, Directly Controls other Devices, Low X-10 Signal Absorption, etc...
In addition to light switches, you'll probably want to control other devices. Available are lamp modules (to control desk lamps), appliance modules (perhaps you want to control a box fan or higher wattage device), irrigation controllers, etc...
 |  |  |
Once you install your switches and modules, you will need to assign each one a unique code. This is how the Cortexa will know which switch or module to "talk" to or which module is talking to it. The X-10 protocol allows for up to 256 unique codes. This unique code or address is divided into two parts, a House Code (the letters A through P) and a Unit Code (the numbers 1 through 16). You may want to assign House Codes by areas. For example, you may want to use the House Code "A" for the master suite. In this case, the main light could be A1, bed-side lamp A2, overhead fan switch could be A3. Your kitchen lights and modules could be B1, B2, etc...
The X10.com switches and modules are assigned an address by selecting a letter (House Code) and number (Unit Code) on the two dials (you can see the dials on the lamp module above).
The ToggleLinc switches have many, many options that can be programmed into them, including the address. In order to set the address of the ToggleLinc (the switch must be installed first), press and hold the small LED above the switch for three (3) seconds then release. The LED will begin blinking and the light(s) attached to the switch will turn on. At this point you have 30 seconds to transmit the address for this switch. The switch will accept the first address it finds on the powerline. There are several ways to transmit an address on the powerline. You can use a special handheld X-10 transmitter, the Cortexa or a software program on your computer (in which case you also need the PowerLinc or similar X-10 interface/controller attached to your computer). I have an older CM11A X-10 controller (attached to my computer) that I bought from X10.com. Using their software (ActiveHome), I simply configure a new virtual switch with the address I want to use for the ToggleLinc.
Once the ToggleLinc is in programming mode, I "turn on" this new switch in ActiveHome. The ToggleLinc will see this new address transmitted over the power lines and will accept this as its permanent address. Of course, when programming a new switch like this, it's important to make sure that no other X-10 devices (or the Cortexa) transmit any other X-10 commands during this time or the ToggleLinc may intercept and accept the wrong address.Since your X-10 devices are going to be directly wired into your home's electrical system, you may wish to consider a "whole house" surge suppressor. It's possible to invest quite a lot of money into switches and modules and you don't want them ruined from unexpected surges. The surge suppressor (or Transient Voltage Surge Suppressor) can cost $100 - $200, but can potentially save you a lot of money. Not only will your X-10 devices be better protected, but so will your other home electronic equipment. This device will need to be wired directly into your electrical panel, so you will probably need an electrician's help. I mounted mine flush with the wall just below my electrical panels. I live in an area with frequent lightning storms and we have power outages all the time. So far I haven't had and X-10 or electronic equipment go bad because of surges.
Another device you may wish to consider purchasing is a bridge/repeater. Most homes in North America have split phase or 3-wire single-phase in the electrical panel. Basically this means there are two separate 120 volt legs (when combined produce 240 volts). Most lights and receptacles in the house will be balanced between the two 120v legs. In order for an X-10 signal to jump from one leg to the other,
it has to travel to the distribution transformer outside of your house and back into your house on the other leg. The signal can have a difficult time jumping through the transformer and become lost. This can manifest itself when your X-10 interface is on one leg of the electrical system, and seems to work fine with some X-10 devices, but doesn't work (or works sporadically) with X-10 devices on the other leg. This is where the bridge repeater comes in. This handy device can plug into a dryer 220v outlet. It "bridges" the two legs of the electrical system and allows the signals to jump between them without having to go all the way out to the street transformer and back. What's more, the bridge/repeater will detect X-10 signals on the powerlines and send them back out amplified. This is especially important if you have a very large home (3500+ sq ft) where the X-10 signal is not strong enough to make it all the way from the controller to the switch/module. My home is 4200+ sq ft and I've had great luck with my bridge/repeater. I rarely, if ever, have a missed signal or non-complying switch or module.Once you have your switches, modules and other X-10 devices installed and configured with addresses, you are then ready to set up the Cortexa to control them. Enter the Cortexa Configuration Utility as described above. Click on the "Device Manager" link and you should see a screen similar to this:
Device manager Screen
Click the "Add New Device" button and you should see the New Device setup screen.
Device manager Screen
The first step is to select "X-10 Device" for the Hardware Type. Next select a description for the X-10 device like "Ceiling Lights" or "Desk Lamp". You will probably want your devices grouped by room, so select the room name from the drop-down box or if the room name hasn't been created yet, select "New" from the drop-down and type in the new room name in the text field below. You may then select the appropriate graphic image for your X-10 device. You can also upload your own images into the Cortexa by using the "Graphics Manager". Select the proper answers for the remaining questions and make sure you enter the proper address for this particular X-10 device. When you are finished you can save your settings.
When you have set up all of your X-10 devices, you will probably want to set up "Events" so that you can control these devices.