Home Automation - HVAC thermostats
The Cortexa works with a few different brands of thermostats. I chose to use the HAI OMNISTAT RC-80B. This particular model is a single stage heat/cool thermostat. The OMNISTAT has some great
features.  Not only does it have a "heat" and "cool" mode, but also an "auto"mode where you can set a heat and cool point and the thermostat will automatically
switch between modes. The thermostat also has a filter reminder so you know when it's time to replace the filters. The thermostat can be controlled locally by pressing the buttons on the OMNISTAT
or remotely by a computer (Cortexa). When it's being controlled by a computer, the word "REMOTE" appears on the display screen.
Not only does it have a "heat" and "cool" mode, but also an "auto"mode where you can set a heat and cool point and the thermostat will automatically
switch between modes. The thermostat also has a filter reminder so you know when it's time to replace the filters. The thermostat can be controlled locally by pressing the buttons on the OMNISTAT
or remotely by a computer (Cortexa). When it's being controlled by a computer, the word "REMOTE" appears on the display screen.
When connected to the Cortexa, the thermostat time is automatically synched to the Cortexa's clock (which is so much nicer than having to run around and change the time on your thermostats twice a year). Another interesting feature is that the outside temperature (retrieved from a local or remote weather station by the Cortexa) is sent to and displayed on the OMNISTAT screen. The Cortexa user interfaces always display the outside weather, but it's really handy to be able to look at the thermostat, while walking by, and see the outside temp.
In addition to the standard thermostat wires, the OMNISTAT requires a separate communications wire (serial cable).
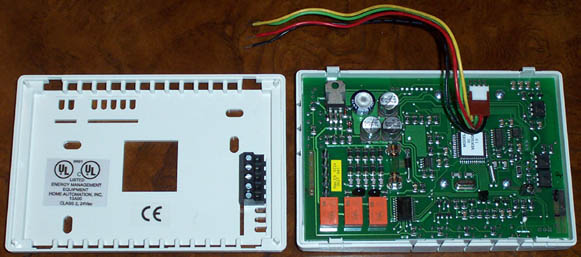
HAI OMNISTAT with Back Cover Removed. Serial Communications Connector/Wire Shown
If you're building a new home, this extra cable won't be a problem. You simply add it to your "pre-wire" list. If you're installing the thermostat in an existing home (i.e replacing an existing thermostat), life just got a lot harder. I used Cat5 cable for my communications wire. I have three thermostats in my house (one upstairs and two downstairs). In one location, my thermostat was located on the wall above a security system keypad and that was located above a light switch. Behind the thermostat was a 2x8 mounting board. The thermostat wires were stapled inside the wall, so I couldn't use them as a "pull line". I had to remove the existing thermostat, drill through the 2x8 backing board (while trying to avoid the wires from the other devices mounted there), go up in the attic and drill a hole through the double top plate of the wall and then try to get a fish tape from one end to the other. I was lucky that the house was only one story tall in this location.
If you have multiple OMNISTATs in your home, you will connect the communication wires from them in parallel so that you only have a single DB-9 serial connector on the Cortexa end. Because the thermostats will all be connected on the same serial cable(s), each thermostat will need to be programmed with a unique address.
I debated the best way to connect all of the thermostat serial cables in parallel. My first thought was to make an octopus type cable for the Cortexa end (similar to the serial expansion cable that Cortexa uses for the additional serial ports), but I decided I didn't want to go that route for a couple of different reasons. I finally decided to make a junction box where all of the thermostats and Cortexa would plug in using standard RJ45 plugs using standard T-568B straight-through ethernet cable pinouts. It makes it really easy on the junction box side of things because you don't have to separate out specific wires. You simply crimp on a RJ45 and it works.
Wiring diagram for connecting multiple HAI OMNISTAT thermostats (Click here for larger view)
I made the thermostat junction box from parts that I picked up at Home Depot. I purchased a small Leviton box and face plate with openings for four quick snap-in jacks.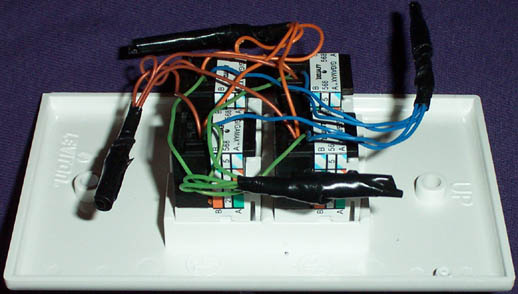 I purchased four Cat5 jacks and then wired
them all together in parallel. Since I knew the thermostats only use four wires, I didn't bother to connect the rest of the unused colors/wires. The snap-in jacks come with a little plastic punch-down tool so if you don't
already own a tool, you may not need to purchase one. I stripped the jacket back on some Cat5 and cut off about 6 inches of wire and used that to connect to the snap-in jacks. I followed the correct wiring for the colors used.
Once all the jacks had the wires punched down, I soldered all the like colors together and taped them off (I didn't have any small wire nuts) and screwed the face plate to the box.
I purchased four Cat5 jacks and then wired
them all together in parallel. Since I knew the thermostats only use four wires, I didn't bother to connect the rest of the unused colors/wires. The snap-in jacks come with a little plastic punch-down tool so if you don't
already own a tool, you may not need to purchase one. I stripped the jacket back on some Cat5 and cut off about 6 inches of wire and used that to connect to the snap-in jacks. I followed the correct wiring for the colors used.
Once all the jacks had the wires punched down, I soldered all the like colors together and taped them off (I didn't have any small wire nuts) and screwed the face plate to the box.
I'm really happy with how this junction box works. When I was installing my second thermostat, I could not get it to work properly. After a little troubleshooting I was leaning toward a broken wire. The ability to quickly plug and unplug the thermostats from the junction box made it very easy to find the problem.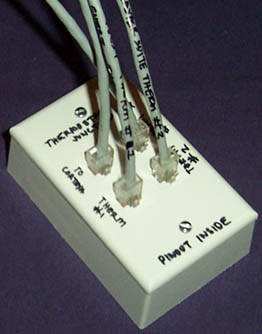 It turned out that I had a broken wire at the rear of the thermostat where the Cat5 was crimped to the OMNISTAT communications
wire. The OMNISTAT comes with Type B crimp splices and I think one of the tiny teeth inside the splice cut the Cat5 wire in half.
It turned out that I had a broken wire at the rear of the thermostat where the Cat5 was crimped to the OMNISTAT communications
wire. The OMNISTAT comes with Type B crimp splices and I think one of the tiny teeth inside the splice cut the Cat5 wire in half.
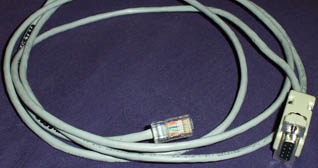
Cortexa to OMNISTAT Junction Box Cable
The cable that connects the Cortexa to the junction box has a female DB-9 connector on one end and an RJ45 on the other. The DB-9 connects to a serial port on the Cortexa and the RJ45 end simply plugs into the junction box and everything is connected.
Once you have installed the thermostats, you will need to program each one with a unique address and the proper settings so the Cortexa can control them. In order to program the OMNISTAT, you must enter what HAI calls "Installer Setup mode". You can do this by pressing the "Prog" key three times (day will flash) then press the "Fan" key. While in "Installer Setup mode", you will use the following to navigate:
00 - Address
This is where you set the unique address of each thermostat. The first thermostat should be "1" and each additional thermostat should be numbered consecutively.
01 - Communications Mode
The thermostat has four communications mode. In order for the Cortexa and the thermostat to communicate with one another, you should select "0". This mode is 300 baud, RS-232 mode.
02 - System Options
The thermostat can be configured with the following options. Select that option that is applicable for your system. I selected "5" for my system.
03 - Display Options
The thermostat can be configured to display the following attributes. Because the Cortexa will be controlling the thermostat(s), I selected "5"
The next step is to configure the Cortexa to communicate with the thermostats. You do this by entering the Cortexa Configuration Utility and selecting the "Sub-System Setup" option. Select the Serial/Com port on the Cortexa to which your thermostats are connected and Save your changes.

HAI OMNISTAT Thermostat Sub-System Setup
Now you will want to set up each thermostat as a device so the Cortexa can control and display them in the user interface. In the Cortexa Configuration Utility select "Device Manager".
HAI OMNISTAT Thermostat Device Setup
Once the New Device screen display, you will want to select "Omnistat (Cortexa)" for the Hardware Type. Next select a description for the OMNISTAT. I use "Thermostat". You will probably want your thermostats grouped by room, so select the room name from the drop-down box or if the room name hasn't been created yet, select "New" from the drop-down and type in the new room name in the text field below. You may then select the appropriate graphic image for your thermostat (thermostat.gif). You can also upload your own images into the Cortexa by using the "Graphics Manager". Select the proper answers for the remaining questions and make sure you enter the proper address for this particular thermostat. Repeat these steps for each thermostat and remember to save your settings.
When you have set up all of your thermostats, you should be able to see them in the user interface. They will display under the "Rooms" and "Climate" menus/buttons. You can then set the heat and cool point for each thermostat and set it in "Auto" mode and the thermostat will maintain the temperature within the range you have selected. If you want more complex control of the temperature/thermostats, you will probably want to set up "Events" so that you can control these thermostats.
Not only does it have a "heat" and "cool" mode, but also an "auto"mode where you can set a heat and cool point and the thermostat will automatically
switch between modes. The thermostat also has a filter reminder so you know when it's time to replace the filters. The thermostat can be controlled locally by pressing the buttons on the OMNISTAT
or remotely by a computer (Cortexa). When it's being controlled by a computer, the word "REMOTE" appears on the display screen.When connected to the Cortexa, the thermostat time is automatically synched to the Cortexa's clock (which is so much nicer than having to run around and change the time on your thermostats twice a year). Another interesting feature is that the outside temperature (retrieved from a local or remote weather station by the Cortexa) is sent to and displayed on the OMNISTAT screen. The Cortexa user interfaces always display the outside weather, but it's really handy to be able to look at the thermostat, while walking by, and see the outside temp.
In addition to the standard thermostat wires, the OMNISTAT requires a separate communications wire (serial cable).
HAI OMNISTAT with Back Cover Removed. Serial Communications Connector/Wire Shown
If you're building a new home, this extra cable won't be a problem. You simply add it to your "pre-wire" list. If you're installing the thermostat in an existing home (i.e replacing an existing thermostat), life just got a lot harder. I used Cat5 cable for my communications wire. I have three thermostats in my house (one upstairs and two downstairs). In one location, my thermostat was located on the wall above a security system keypad and that was located above a light switch. Behind the thermostat was a 2x8 mounting board. The thermostat wires were stapled inside the wall, so I couldn't use them as a "pull line". I had to remove the existing thermostat, drill through the 2x8 backing board (while trying to avoid the wires from the other devices mounted there), go up in the attic and drill a hole through the double top plate of the wall and then try to get a fish tape from one end to the other. I was lucky that the house was only one story tall in this location.
If you have multiple OMNISTATs in your home, you will connect the communication wires from them in parallel so that you only have a single DB-9 serial connector on the Cortexa end. Because the thermostats will all be connected on the same serial cable(s), each thermostat will need to be programmed with a unique address.
I debated the best way to connect all of the thermostat serial cables in parallel. My first thought was to make an octopus type cable for the Cortexa end (similar to the serial expansion cable that Cortexa uses for the additional serial ports), but I decided I didn't want to go that route for a couple of different reasons. I finally decided to make a junction box where all of the thermostats and Cortexa would plug in using standard RJ45 plugs using standard T-568B straight-through ethernet cable pinouts. It makes it really easy on the junction box side of things because you don't have to separate out specific wires. You simply crimp on a RJ45 and it works.
Wiring diagram for connecting multiple HAI OMNISTAT thermostats (Click here for larger view)
I made the thermostat junction box from parts that I picked up at Home Depot. I purchased a small Leviton box and face plate with openings for four quick snap-in jacks.
I purchased four Cat5 jacks and then wired
them all together in parallel. Since I knew the thermostats only use four wires, I didn't bother to connect the rest of the unused colors/wires. The snap-in jacks come with a little plastic punch-down tool so if you don't
already own a tool, you may not need to purchase one. I stripped the jacket back on some Cat5 and cut off about 6 inches of wire and used that to connect to the snap-in jacks. I followed the correct wiring for the colors used.
Once all the jacks had the wires punched down, I soldered all the like colors together and taped them off (I didn't have any small wire nuts) and screwed the face plate to the box.I'm really happy with how this junction box works. When I was installing my second thermostat, I could not get it to work properly. After a little troubleshooting I was leaning toward a broken wire. The ability to quickly plug and unplug the thermostats from the junction box made it very easy to find the problem.
It turned out that I had a broken wire at the rear of the thermostat where the Cat5 was crimped to the OMNISTAT communications
wire. The OMNISTAT comes with Type B crimp splices and I think one of the tiny teeth inside the splice cut the Cat5 wire in half.Cortexa to OMNISTAT Junction Box Cable
The cable that connects the Cortexa to the junction box has a female DB-9 connector on one end and an RJ45 on the other. The DB-9 connects to a serial port on the Cortexa and the RJ45 end simply plugs into the junction box and everything is connected.
Once you have installed the thermostats, you will need to program each one with a unique address and the proper settings so the Cortexa can control them. In order to program the OMNISTAT, you must enter what HAI calls "Installer Setup mode". You can do this by pressing the "Prog" key three times (day will flash) then press the "Fan" key. While in "Installer Setup mode", you will use the following to navigate:
- The small digits on the top of the display are the item numbers.
- The large blinking digits in the center of the display are the value of the item number.
- Press the Prog (>) key to advance to the next item.
- Press the Hold (<) key to return to the previous item.
- Use the arrow keys (^ - v) to change the value of each item.
- Do not set the values to anything other than the specified range for each item.
- To exit Setup mode, press the Fan key.
00 - Address
This is where you set the unique address of each thermostat. The first thermostat should be "1" and each additional thermostat should be numbered consecutively.
01 - Communications Mode
The thermostat has four communications mode. In order for the Cortexa and the thermostat to communicate with one another, you should select "0". This mode is 300 baud, RS-232 mode.
02 - System Options
The thermostat can be configured with the following options. Select that option that is applicable for your system. I selected "5" for my system.
| 0 | auto changeover | no fan with heat |
| 1 | auto changeover | fan on with heat |
| 4 | manual changeover | no fan with heat |
| 5 | manual changeover | fan on with heat |
| 12 | heat only | no fan with heat |
| 13 | heat only | fan on with heat |
| 20 | cool only |
03 - Display Options
The thermostat can be configured to display the following attributes. Because the Cortexa will be controlling the thermostat(s), I selected "5"
| 0 | celsius | am/pm time format | programmable |
| 1 | fahrenheit | am/pm time format | programmable |
| 2 | celsius | 24-hour time format | programmable |
| 3 | fahrenheit | 24-hour time format | programmable |
| 4 | celsius | am/pm time format | non-programmable |
| 5 | fahrenheit | am/pm time format | non-programmable |
| 6 | celsius | 24-hour time format | non-programmable |
| 7 | fahrenheit | 24-hour time format | non-programmable |
The next step is to configure the Cortexa to communicate with the thermostats. You do this by entering the Cortexa Configuration Utility and selecting the "Sub-System Setup" option. Select the Serial/Com port on the Cortexa to which your thermostats are connected and Save your changes.
HAI OMNISTAT Thermostat Sub-System Setup
Now you will want to set up each thermostat as a device so the Cortexa can control and display them in the user interface. In the Cortexa Configuration Utility select "Device Manager".
HAI OMNISTAT Thermostat Device Setup
Once the New Device screen display, you will want to select "Omnistat (Cortexa)" for the Hardware Type. Next select a description for the OMNISTAT. I use "Thermostat". You will probably want your thermostats grouped by room, so select the room name from the drop-down box or if the room name hasn't been created yet, select "New" from the drop-down and type in the new room name in the text field below. You may then select the appropriate graphic image for your thermostat (thermostat.gif). You can also upload your own images into the Cortexa by using the "Graphics Manager". Select the proper answers for the remaining questions and make sure you enter the proper address for this particular thermostat. Repeat these steps for each thermostat and remember to save your settings.
When you have set up all of your thermostats, you should be able to see them in the user interface. They will display under the "Rooms" and "Climate" menus/buttons. You can then set the heat and cool point for each thermostat and set it in "Auto" mode and the thermostat will maintain the temperature within the range you have selected. If you want more complex control of the temperature/thermostats, you will probably want to set up "Events" so that you can control these thermostats.