LCD MAME Cabinet - T-Molding, MAME Computer & Monitor
Installing the T-molding
Once the Formica work is finished, t-molding can be installed. The t-molding is flexible plastic and will usually be delivered in a roll. As mentioned
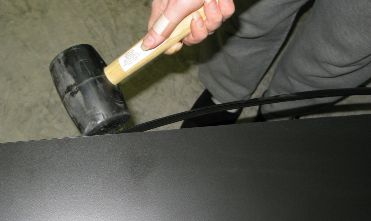 |
| Installing T-Molding |
Once the t-molding is in place, it's not going to want to come out too easily (and it's probably a good idea to not remove it unless it's an emergency), so keep it fairly taut while pounding it in and move little by little.
Installation is fairly straightforward. The only complexity is when the molding needs to go around an outside corner. Because
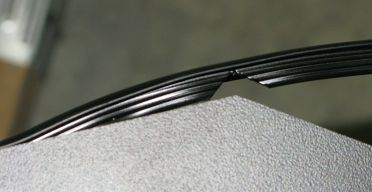 |
| Cutting T-Molding to go Around a Corner |
Mounting the monitor
At first I was unsure how to mount the monitor. After thinking about it for a while, I came up with a solution that seems to work fairly well. Part of the difficulty was trying to precisely mount it so it would sit perfectly up against the glass and also be horizontally and vertically positioned within the border/frame that I spray painted on the glass. I also wanted it to be removable if needed (due to monitor going bad or when taking apart the cabinet for moving or storing)
I decided to mount (glue and screw) two larger blocks on the inside of each cabinet wall. I then cut a piece of plywood that was just slightly less than the
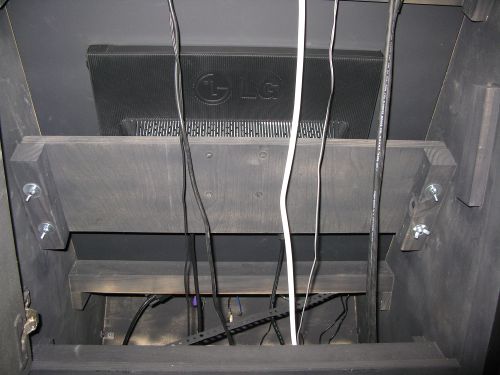 |
| Mount holds LCD Monitor Up Against Back of Glass (painted black) |
Electrical
I decided to put the on/off switch up on the top of the cabinet. I used a standard light switch that you would find in your house. I mounted it in a standard electrical box on the inside of the cabinet. This keeps the switch hidden from view (unless you're tall enough to see the top of the cabinet), but easily accessible. The switch is connected to and runs through a standard household plug that is at the bottom of the cabinet that is mounted on a shelf that sits about 8" off the bottom. This is then wired to the plug wire that goes out the back of the cabinet and to the wall.
I have a power strip that is plugged into the plug at the bottom of the cabinet and this is where I plug in the computer, the speakers, the monitor, etc...
Installing the MAME Computer Components
I don't have the computer in a case. Rather, I have the motherboard mounted to the underside of the shelf at the bottom of the cabinet. On the top of the shelf I have the hard drive (in a standard hard drive mount) and the power supply. I cut a round hole (about 3" diameter) in the back of the cabinet where the power supply is mounted. I covered this hole with a standard safety screen on the outside of the cabinet. This hole is for air flow/ventilation for the power supply. The power supply is mounted backward compared to how it would be in a computer case. It pulls in air from the back and exhausts it into the interior of the cabinet.
At the top of the cabinet, the back side of the marquee area is angled. I used my table saw to cut a bunch of parallel slots in that board to create a vent for the cabinet. The idea is that the power supply will pull in cool fresh air from the bottom outside of the cabinet. The warm exhaust air from the power supply, motherboard and monitor will all rise and exit the top slotted vent at the top.