LCD MAME Cabinet - T-Molding Slot and Marquee
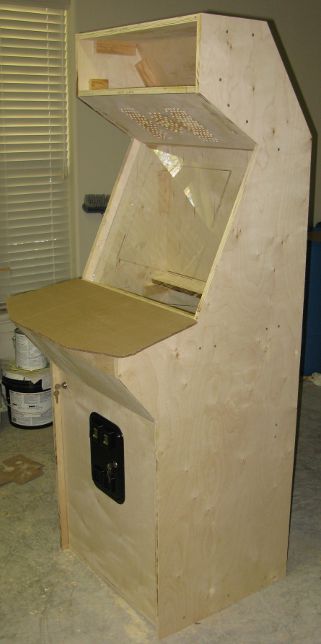 |
| Nearly Finished MAME Cabinet |
The Marquee
The cabinet construction was nearly complete at this point. One of the final steps was to come up with a solution for the marquee area. I purchased a small fluorescent tube light at the store to mount on the marquee board. However, I wasn't certain how I would hold the marquee in place. I wanted easy access to the light fixture in case I needed to replace bulbs. In the end I settled on using Velcro to hold the marquee sign in place. I glued long blocks (about 3/4" tall) along the inside of the top, bottom and sides of the marquee area. In order to figure out how far back to glue these blocks (so that the marquee would be flush with the front of the cabinet), I first measured the thickness of the Velcro and the thickness of the marquee with frame.
For the marquee frame, I purchased an inexpensive picture frame from Wal-Mart. The frame is actually black plastic. It is the same concept as the plastic spines you would use if you were creating a report with a clear cover. The plastic spine simply slips over the spine edge of the pages and stays in place with friction. I cut this frame down to the size of my marquee opening. The clear plastic that would normally cover the picture was also cut to size to protect the marquee. I then adhered one side of the Velcro to various sections on the back of the frame. The other side of the Velcro was adhered to the proper places on the wooden blocks in the marquee cabinet. When finished, the marquee is simply pushed into place and the Velcro holds it nicely.
I ordered a custom marquee and a matching bezel graphic from GameOnGrafix.com. They make high quality prints. The bezel is a self-adhesive and to this day hasn't bubbled or peeled up. They also have side art and tabletop prints, as well as control panel graphics. They'll even custom design graphics for you.
Cutting the Slot
The next step in the process was to remove the doors and the other front and rear parts of the cabinet so that only the sides remained.
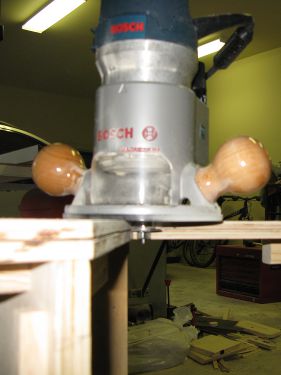 |
| Cutting slot for T-molding with router |
T-molding can be purchased by the foot and comes in all kinds of colors, styles and sizes. I purchased mine from T-Molding.com and was happy with their service.
In order to cut this slot, you will need to have a router and a slot cutter bit. If you don't have a router, you may be able to rent one from your local hardware rental store. T-Molding.com sells slot cutter bits, if you need one. Once the bit has been installed in the router, you will need to adjust it so it cuts the slot down the middle of plywood edges. I cut a slot completely around both sides of the cabinet and also on the horizontal edges of the marquee area (top and bottom).
After cutting the slots, I then spray painted the entire inside, edges and back of the cabinet black (I didn't choose to use Formica on the back of the cabinet since it would be against the wall). I did this painting just as a precautionary measure to make sure no light from the inside of the cabinet (monitor or marquee light) bled out through joints in the cabinet. I also wanted to make sure that no wood color would show in case I didn't get the Formica perfectly to the edge of all joints.